
LinkedIn Sales Navigator is the most powerful tool for B2B sales professionals looking to generate qualified leads and close more deals.
Think about your typical prospecting process:
You’re spending hours scrolling through LinkedIn profiles, trying to find decision-makers. You’re hitting search limits on the free version. You’re struggling to keep track of which prospects you’ve contacted and when.
Read Also: LinkedIn Sales Navigator vs Apollo: Which Tool Works Better?
Meanwhile:
Your competitors are connecting with 4x more decision-makers using advanced search filters
They’re getting instant notifications when prospects change jobs or companies
They’re using AI-powered insights to personalize outreach and boost response rates by up to 5x
If you’re not using Sales Navigator effectively, you’re missing out on a constant flow of qualified leads who are ready to engage.
In this guide, you’ll learn how to master LinkedIn Sales Navigator and
transform it into your most powerful sales tool.
Ready to generate more qualified leads? Let’s get started.
💡 Pro Tip: According to LinkedIn’s 2024 data, Sales Navigator users see a 45% average increase in deal size and a 29% lift in sales opportunities. This guide will show you exactly how to achieve similar results.
What Is LinkedIn Sales Navigator?
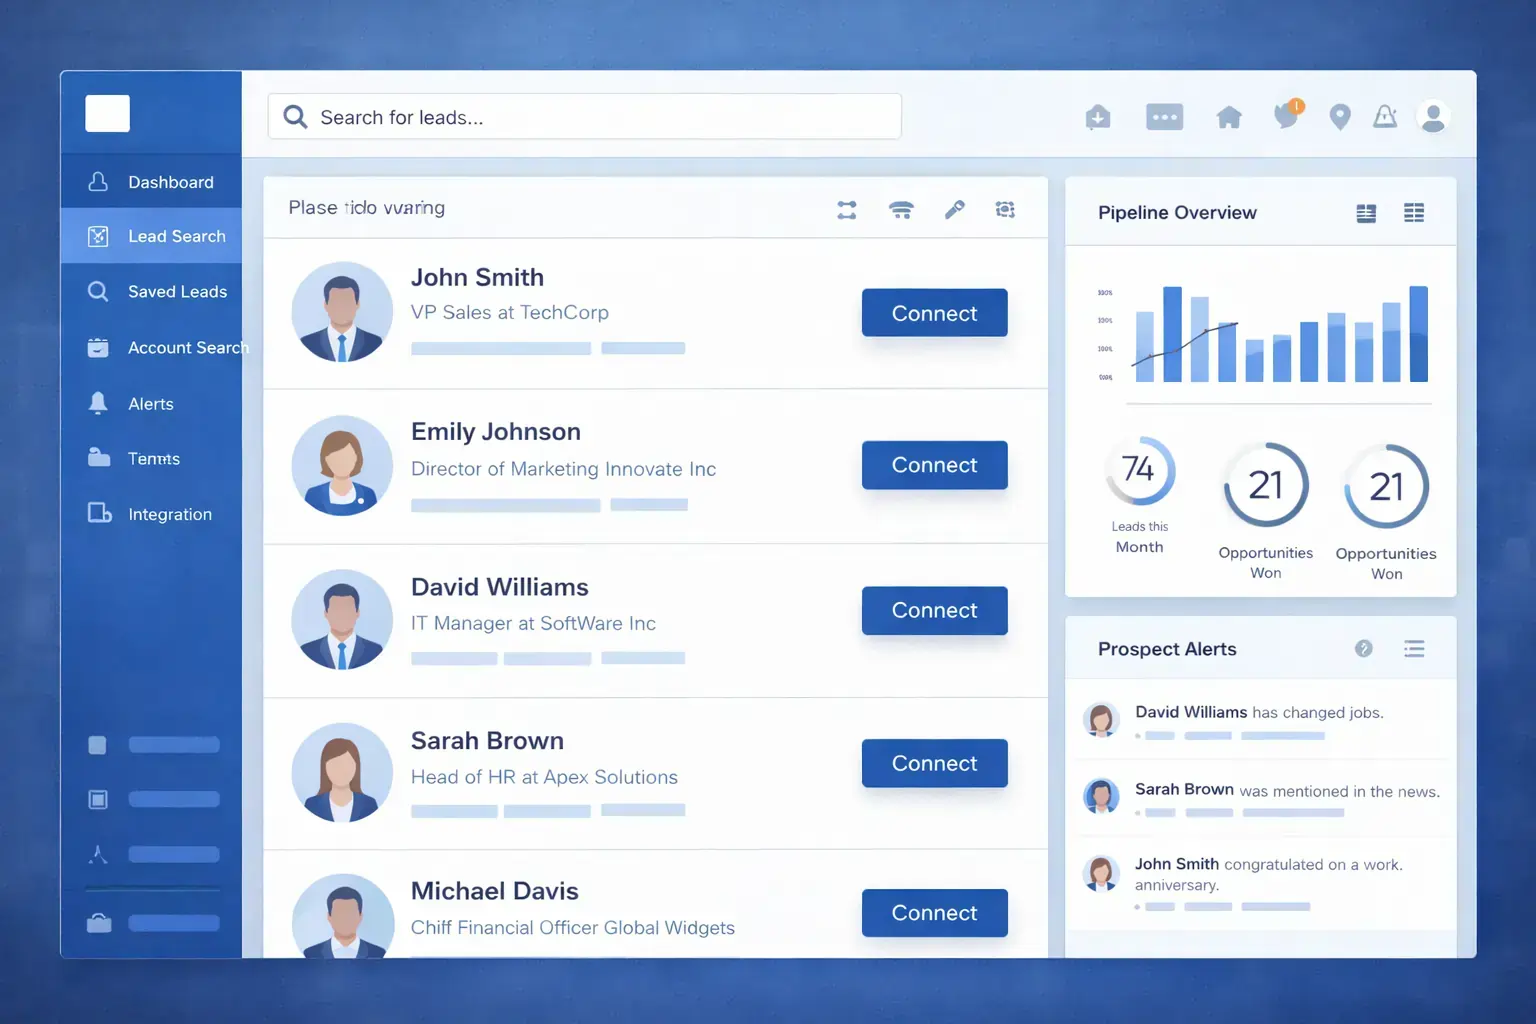
LinkedIn Sales Navigator is a premium subscription tool designed specifically for sales professionals, marketers, and business development teams who need advanced prospecting capabilities.
Unlike LinkedIn’s free version or even Premium Business accounts, Sales Navigator gives you:
Advanced search filters: Over 40 filters to find your exact target audience by industry, seniority, company size, geography, and more
Unlimited searches: No more hitting search limits when prospecting
InMail credits: 50 monthly InMail messages to reach prospects directly, even without a connection
AI-powered insights: Lead IQ and Account IQ features that provide instant buyer summaries and account intelligence
Real-time alerts: Get notified when prospects change jobs, companies post news, or show buying signals
CRM integration: Sync with Salesforce, HubSpot, and other CRMs to streamline your workflow
What’s the Difference Between Premium Business and Sales Navigator?
This is one of the most common questions, so let’s clear it up:
LinkedIn Premium Business is designed for general professional development. It gives you more profile views, learning courses, and basic InMail credits.
LinkedIn Sales Navigator is built specifically for sales. It offers powerful search capabilities, improved visibility into extended networks, personalized lead recommendations, and tools designed to help you reach decision-makers and close deals.
Bottom line: If you’re in sales, business development, or lead generation, Sales Navigator is the tool you need.
Read Also: Canva vs Piktochart – Which is Best for Infographics?
🔥 LinkedIn Premium Business Plan 12 Months
Original Price ₹23,000 • Get it ₹8XXX
🤖 Gemini AI Advanced Pro Plan
Original Price ₹19,500 • Get it ₹8XXX
💼 LinkedIn Sales Navigator Core
Original Price ₹80,000 • Get it ₹2XXXX
🎨 Canva Pro Lifetime Access
Original Price ₹3,999 • Get it ₹4XX
📚 Coursera Plus Annual Plan
Original Price ₹33,000 • Get it ₹2XXX
✨ Adobe Creative Cloud All Apps
Original Price ₹59,000 • Get it ₹4XXX
Sales Navigator Plans and Pricing
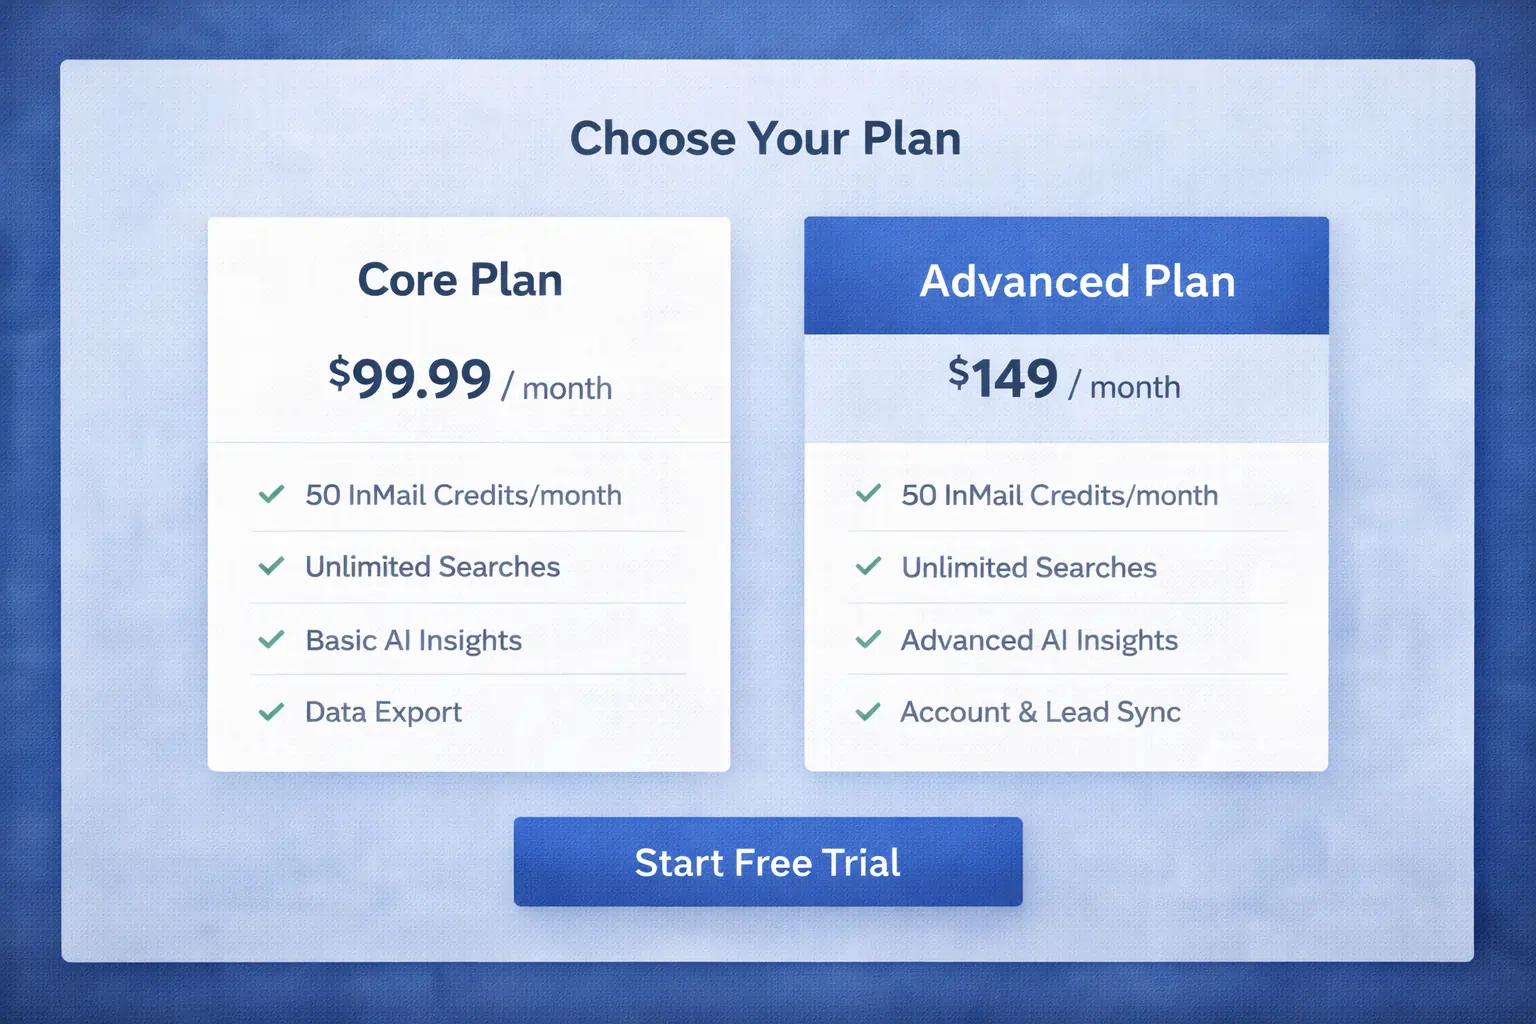
Sales Navigator offers three pricing tiers as of 2026, each designed for different team sizes and needs:
| Feature | Core | Advanced |
| Pricing | $99.99/month | $149/month |
| Best For | Individual sellers | Sales teams |
| InMail Credits | 50/month | 50/month |
| AI Features | Basic | Account IQ & Lead IQ |
| CRM Integration | ❌ | ❌ |
Save Money: Opting for an annual subscription can save you up to 20% compared to monthly billing. LinkedIn also offers a 30-day free trial for Core and Advanced plans, allowing you to test features before committing.
1. Set Up Your Sales Navigator Account
Before you can start generating leads, you need to set up your account properly. This foundation will make everything else easier.
Sign Up and Choose Your Plan
Visit the LinkedIn Sales Navigator page and click “Start your free trial”
Choose between Core or Advanced plan (you can upgrade later)
Complete the payment information (you won’t be charged during the trial)
Optimize Your LinkedIn Profile
Your LinkedIn profile is your digital storefront. When prospects receive your InMails or connection requests, the first thing they’ll do is check your profile.
Here’s what makes a strong Sales Navigator profile:
Professional headshot: Profiles with professional photos get 14x more views
Compelling headline: Go beyond your job title. Focus on the value you provide (e.g., “Helping SaaS Companies Scale Revenue | B2B Sales Expert”)
Strong summary: Explain what you do, who you help, and include a clear call-to-action
Custom button: Add a Calendly link or contact form to make it easy for prospects to book meetings
Featured content: Showcase case studies, testimonials, or valuable resources
Configure Your Sales Preferences
Sales preferences help LinkedIn’s algorithm understand your ideal customer profile and deliver better lead recommendations.
To set up your preferences:
Click your profile icon in Sales Navigator
Go to Settings > Sales Preferences
Define your target geography, industry, company size, and job titles
Save your preferences
These settings power features like Lead Recommendations and help Sales Navigator surface the most relevant prospects for you.
🔥 LinkedIn Premium Business Plan 12 Months
Original Price ₹23,000 • Get it ₹8XXX
🤖 Gemini AI Advanced Pro Plan
Original Price ₹19,500 • Get it ₹8XXX
💼 LinkedIn Sales Navigator Core
Original Price ₹80,000 • Get it ₹2XXXX
🎨 Canva Pro Lifetime Access
Original Price ₹3,999 • Get it ₹4XX
📚 Coursera Plus Annual Plan
Original Price ₹33,000 • Get it ₹2XXX
✨ Adobe Creative Cloud All Apps
Original Price ₹59,000 • Get it ₹4XXX
2. Master Advanced Search to Find Your Ideal Prospects
Advanced search is where Sales Navigator really shines. While free LinkedIn limits you to basic filters and search results, Sales Navigator gives you over 40 search filters to build highly targeted prospect lists.
Key Search Filters You Should Use
Here are the most powerful filters for B2B prospecting:
1. Geography Filters
Target specific countries, states, cities, or postal codes
Perfect for local or regional sales teams
2. Company Filters
Company headcount (e.g., 51-200 employees)
Industry (filter by multiple industries)
Company type (public, private, nonprofit)
Technologies used (e.g., find companies using Salesforce or HubSpot)
3. Job Title and Seniority
Search by current job title or function (Sales, Marketing, IT, etc.)
Filter by seniority level (C-level, VP, Director, Manager)
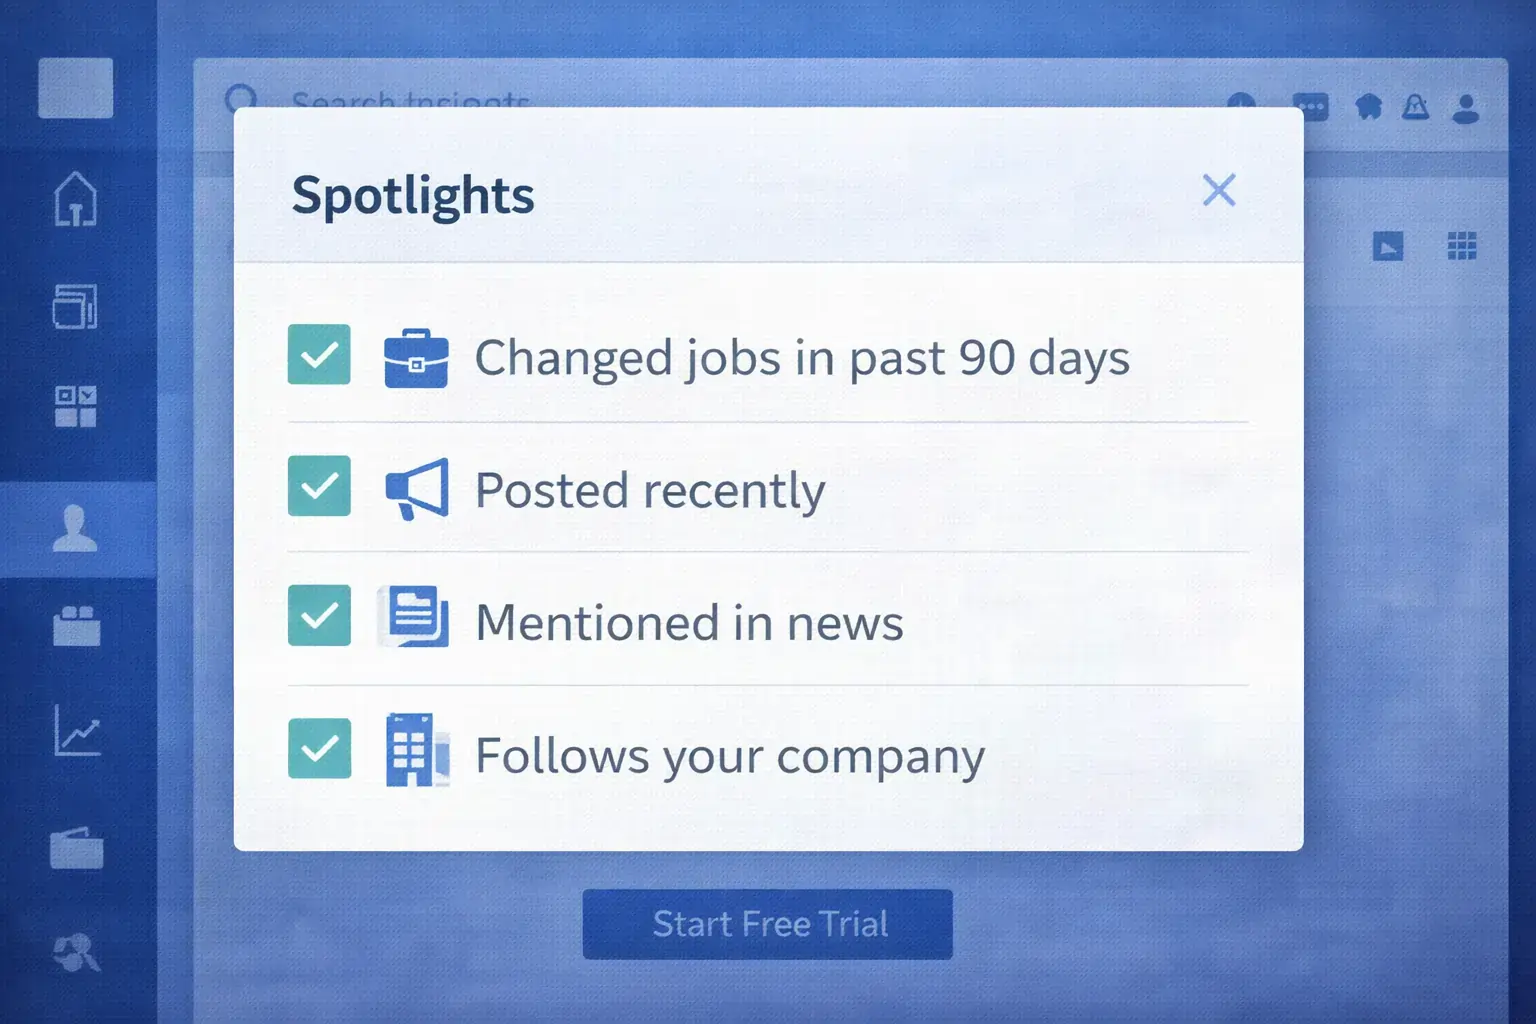
4. Spotlights (This is Gold)
Spotlights help you identify prospects at the perfect moment:
Changed jobs in past 90 days: People in new roles are often looking for new vendors and solutions
Posted on LinkedIn in past 30 days: Engaged users are more likely to respond
Mentioned in the news: Great conversation starter
Follows your company: Warm leads who already know your brand
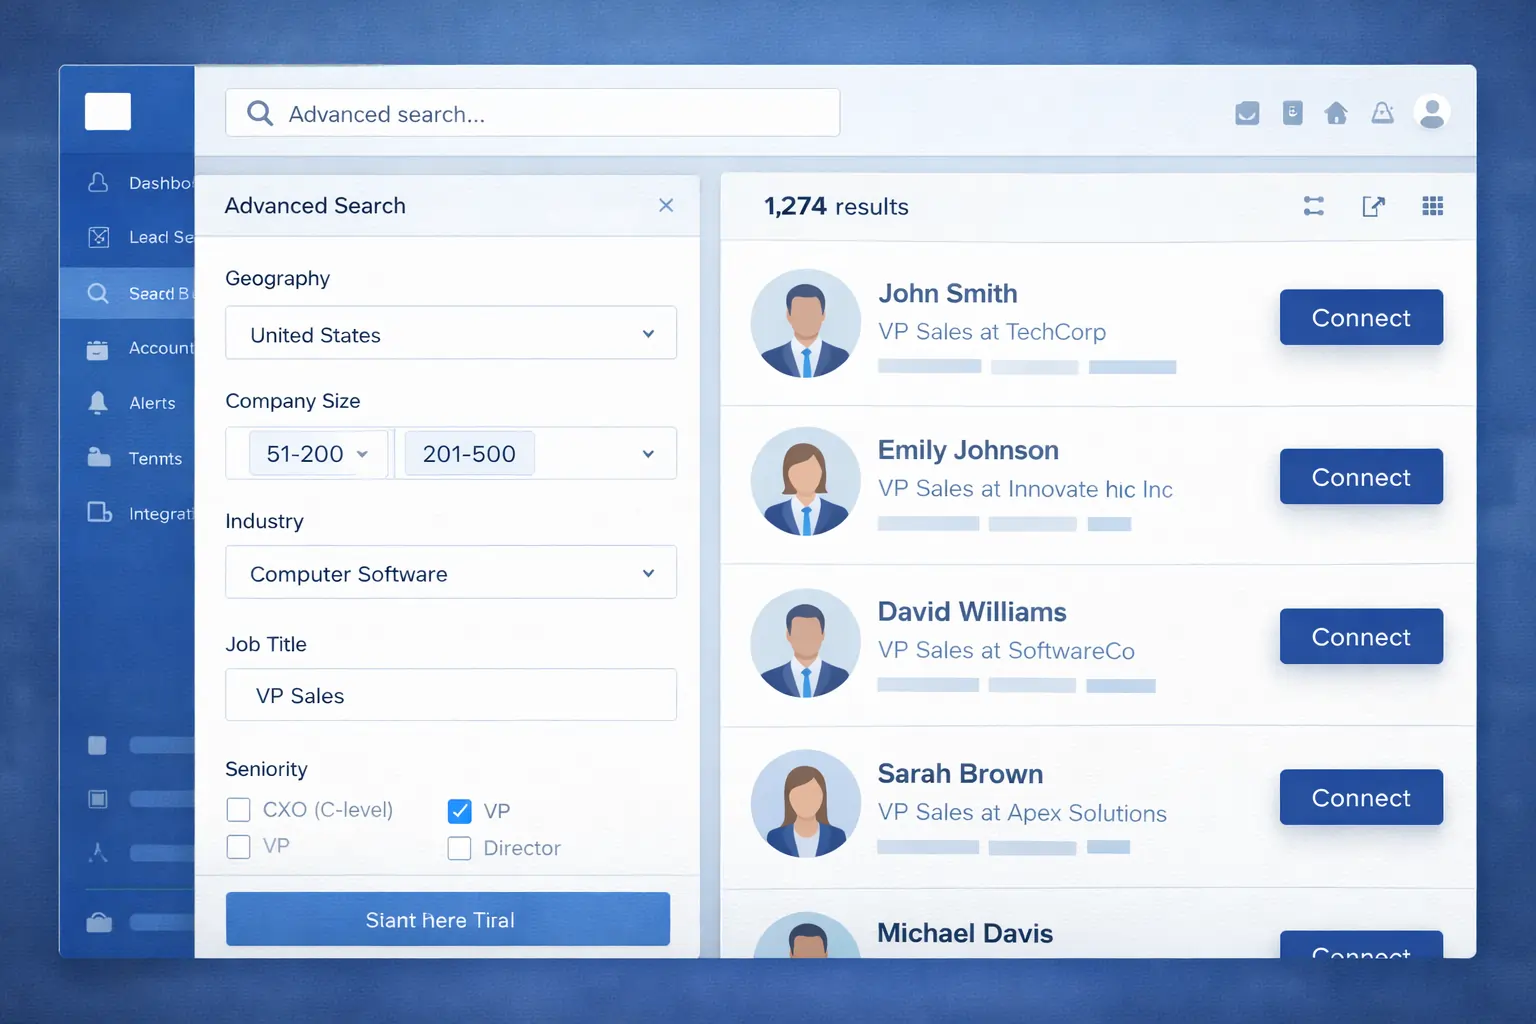
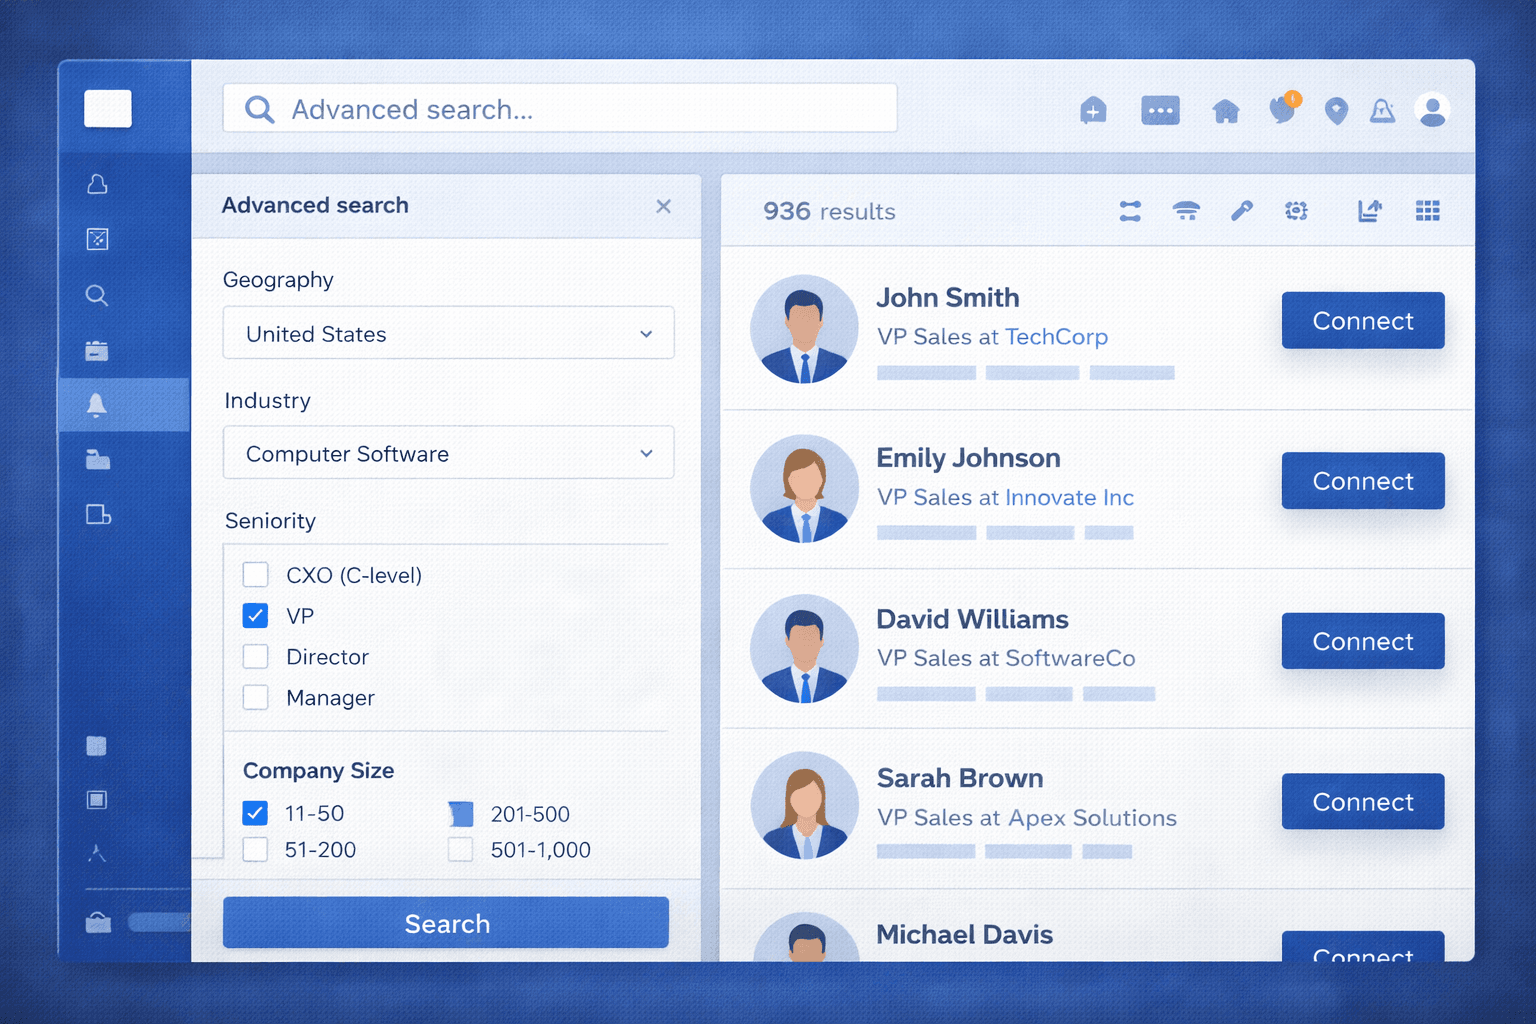
How to Build a Targeted Search
Let’s walk through a real example. Say you want to find VP of Sales at mid-sized SaaS companies in the United States:
Click “Lead Search” in the top navigation
Under Geography, select “United States”
Under Industry, select “Computer Software”
Under Company Headcount, select “51-200” and “201-500”
Under Job Title, type “VP Sales”
Click “Search”
Boom. You now have a list of highly qualified prospects who match your ideal customer profile.
Save Your Searches
Once you’ve created a great search, save it. Sales Navigator will automatically notify you when new prospects match your criteria.
To save a search:
Run your search with all the filters you want
Click “Save Search” at the top of the results
Give it a descriptive name (e.g., “VP Sales – Mid-Size SaaS – US”)
You can access saved searches anytime from your homepage, and you’ll get weekly email updates when new matches appear.
🎯 Pro Tip: Create multiple saved searches for different buyer personas. For example, one for decision-makers, one for influencers, and one for recent job changers. This keeps your pipeline fresh with varied opportunities.
Also Read – LinkedIn Premium vs Sales Navigator: Which LinkedIn Plan Is Best for You in 2026?
3. Leverage AI-Powered Features to Work Smarter
LinkedIn has invested heavily in AI capabilities for Sales Navigator. These features can save you hours of research and help you personalize outreach at scale.
Account IQ: Instant Company Intelligence
Available on Advanced and Advanced Plus plans, Account IQ provides AI-generated summaries of any company in seconds.
What you get:
Company overview and recent news
Strategic priorities and challenges
Key stakeholders and decision-makers
Suggested talking points for outreach
How to use it:
Search for a company in Sales Navigator
Click on the company name
Look for the “Account IQ” section on the company page
Real-world impact: One sales professional reported that Account IQ helped them create pre-sales documents and account plans in minutes instead of hours, allowing them to spend more time actually selling.
Lead IQ: AI-Powered Buyer Insights
Lead IQ aggregates everything you need to know about an individual prospect:
Professional background and experience
Common connections and interests
Recent activity and engagement
Personalized outreach recommendations
Use Lead IQ before sending InMails or making calls to quickly understand who you’re talking to and how to position your solution.
Lead Recommendations: Let AI Find Prospects for You
Based on your sales preferences and past activity, Sales Navigator’s AI recommends highly relevant leads you might have missed.
To access recommendations:
Go to your Sales Navigator homepage
Scroll to “Recommended Leads”
You’ll see a list of prospects with explanations for why they’re a good fit (e.g., “Recently changed jobs” or “Works at a company similar to your saved accounts”).
Spend 10 minutes each day reviewing these recommendations. You’ll often discover high-quality prospects you wouldn’t have found through manual searching.
🔥 LinkedIn Premium Business Plan 12 Months
Original Price ₹23,000 • Get it ₹8XXX
🤖 Gemini AI Advanced Pro Plan
Original Price ₹19,500 • Get it ₹8XXX
💼 LinkedIn Sales Navigator Core
Original Price ₹80,000 • Get it ₹2XXXX
🎨 Canva Pro Lifetime Access
Original Price ₹3,999 • Get it ₹4XX
📚 Coursera Plus Annual Plan
Original Price ₹33,000 • Get it ₹2XXX
✨ Adobe Creative Cloud All Apps
Original Price ₹59,000 • Get it ₹4XXX
4. Master InMail to Reach Decision-Makers Directly
InMail is one of Sales Navigator’s most powerful features. It lets you message anyone on LinkedIn, even if you’re not connected, with significantly higher response rates than cold email.
According to LinkedIn data, personalized InMail messages can boost response rates up to 5x compared to generic outreach.
What Makes a Good InMail?
Bad InMails get ignored. Great InMails get responses. Here’s the difference:
1. Strong Subject Line
Your subject line determines whether your message gets opened. Make it:
Personalized (mention their company or role)
Value-focused (hint at a benefit)
Short and intriguing
Examples:
- ❌ “New solution for your business”
- ✅ “Question about [Company]’s Q4 goals”
2. Personalized Opening
Start with something specific to them:
Reference a recent post they shared
Mention a mutual connection
Congratulate them on a recent achievement or company news
3. Clear Value Proposition
Don’t make it about you. Make it about them. Answer the question: “What’s in it for me?”
- ❌ “We’re a leading provider of…”
- ✅ “I noticed you’re scaling your sales team. I have some insights on how companies like yours reduce onboarding time by 40%.”
4. Specific Call-to-Action
Make it easy for them to say yes:
Ask for a 15-minute call, not an hour
Offer specific time options
Share a Calendly link for easy scheduling
InMail Template Example
Here’s a proven InMail template structure:
Subject: Quick question about [Company]’s [specific goal]
Hi [First Name],
I saw your recent post about [specific topic] and wanted to reach out.
I work with [similar companies] to [specific outcome]. For example, we recently helped [Company Name] achieve [specific result].
Would you be open to a quick 15-minute conversation about [specific topic]? I have some ideas that might be relevant to what you’re working on.
Best,
[Your Name]
Also Read – n8n Pricing Guide 2026: Cloud Cost, Self-Hosted Cost, and Zapier Comparison
5. Organize and Track Your Leads
Sales Navigator gives you powerful tools to organize prospects and stay on top of your pipeline.
Save Leads and Accounts
When you find a promising prospect or company, save them to your account:
Click the “Save” button on their profile
Add custom tags to categorize them (e.g., “Hot Lead,” “Q1 Target,” “Nurture”)
Saved leads and accounts appear in your Sales Navigator homepage, and you’ll receive automatic updates when they:
Change jobs
Post content on LinkedIn
Appear in the news
Use Tags Strategically
Tags help you segment your prospects and prioritize outreach. Here are some effective tagging strategies:
By Stage:
“Prospecting”
“Contacted”
“Qualified”
“Proposal Sent”
By Priority:
“Hot Lead”
“Warm Lead”
“Long-term Nurture”
By Campaign:
“Q1 Outreach”
“Industry Event Follow-up”
Set Up Alerts
Sales Navigator can notify you about important changes to your saved leads and accounts:
Job changes
Company news
New hires at target accounts
Posts and activity from prospects
These alerts give you perfect timing for outreach. For example, if a saved lead posts about a challenge your product solves, you can reach out with a relevant solution.
Read Also: Microsoft 365 and LinkedIn Premium Free for Students
6. Integrate with Your CRM (Advanced Plus)
If you’re on the Advanced Plus plan, CRM integration is a game-changer. It connects Sales Navigator directly with platforms like Salesforce, HubSpot, and Microsoft Dynamics.
Why CRM Integration Matters
Automatic data sync: No more manually copying information between platforms
Real-time alerts in your CRM: Get notified when prospects change jobs or companies without leaving your CRM
Enriched contact data: Automatically update outdated contact information
Create leads directly from Sales Navigator: Save prospects to your CRM with one click
[Image: CRM integration showing LinkedIn data inside Salesforce]
How to set it up:
Go to Settings in Sales Navigator
Select “Integrations”
Choose your CRM platform
Follow the authentication steps to connect
7. Best Practices for Sales Navigator Success
Now that you know the features, here are proven strategies to maximize your results:
Build a Daily Routine
Consistency beats intensity. Dedicate 30-60 minutes daily to Sales Navigator:
10 minutes: Review lead recommendations and saved search updates
15 minutes: Research and save 10-15 new prospects
20 minutes: Send 5-10 personalized InMails or connection requests
15 minutes: Engage with prospect content (like, comment, share)
Engage Before You Pitch
Don’t send a cold InMail to someone you’ve never interacted with. Warm them up first:
Follow them on LinkedIn
Like and comment on their posts
After a few touchpoints, send a personalized InMail
This “social selling” approach builds familiarity and trust before you ask for anything.
Track Your Metrics
Sales Navigator provides analytics on your outreach:
InMail response rate
Profile views
Search appearances
Review these metrics monthly to understand what’s working and what needs improvement.
If your InMail response rate is low, test different subject lines or messaging approaches. If profile views are low, optimize your headline and summary.
Leverage TeamLink
TeamLink (available on Advanced and Advanced Plus) shows you warm paths into target accounts through your team’s connections.
Instead of cold outreach, ask a colleague to make an introduction. Warm referrals convert at much higher rates than cold outreach.
To use TeamLink:
Look for the “TeamLink” icon on prospect profiles
Request an introduction from the mutual connection
8. Common Mistakes to Avoid
Even experienced sales professionals make these mistakes with Sales Navigator:
1. Using Too Many Filters
More filters aren’t always better. Over-filtering can shrink your prospect pool too much. Start with 3-5 key filters, then add more if needed.
2. Generic InMails
Templates are fine as a starting point, but always customize each message. Prospects can spot copy-paste outreach from a mile away.
3. Ignoring Alerts
Job change alerts are goldmines. When a prospect switches roles, they’re often evaluating new vendors. Don’t let these opportunities pass.
4. Not Saving Leads
If you don’t save leads, you won’t get updates about them. Save every prospect you’re interested in, even if you’re not ready to contact them yet.
5. Letting InMails Expire
You get 50 InMail credits per month, and unused credits don’t roll over. Use them or lose them.
Read Also: How to Use Notion for Content Planning
You’ve Got the Tools. Now Use Them.
LinkedIn Sales Navigator is only as powerful as the person using it. With advanced search, AI-powered insights, InMail, and CRM integration, you have everything you need to build a consistent pipeline of qualified leads.
But the tool itself won’t close deals. Success comes from:
Using it consistently (daily prospecting beats sporadic bursts)
Personalizing your outreach (no one responds to generic templates)
Building relationships before asking for the sale
What’s next?
Start your free trial if you haven’t already
Optimize your LinkedIn profile today
Create your first saved search targeting your ideal customer profile
Send 5 personalized InMails this week
The prospects are out there. Sales Navigator helps you find them, understand them, and reach them. Now it’s time to put these strategies into action and start closing more deals.
Ready to transform your sales process?
Start your 30-day free trial of LinkedIn Sales Navigator and see the difference it makes in your pipeline.
This guide is regularly updated to reflect the latest Sales Navigator features and best practices.